SnappyHexMesh-GUI Addon for Blender
Introduction
This add-on turns Blender into a GUI for SnappyHexMesh, a volume mesh generation tool for OpenFOAM®, the open source CFD (computational fluid dynamics) toolbox. The add-on exports a complete OpenFOAM case folder structure, with geometry and dictionary files, ready to run OpenFOAM commands including snappyHexMesh. The aim of the add-on is to
Ease the workflow for importing, updating, modifying and exporting 3D surface meshes to OpenFOAM.
Allow definition of most common SnappyHexMesh settings via Blender GUI, to reduce need for manual modification of OpenFOAM dictionary definitions.
Require minimal Blender skills. Geometry can be modelled in any 3D modelling / CAD program which exports a surface mesh format that can be imported to Blender, such as STL or Wavefront OBJ.
The add-on generates OpenFOAM dictionary files for the surface mesh objects in Blender. Dictionary creation is based on string replacements using template files located in the add-on’s skel directory. The add-on is meant to work on latest LTS release of Blender and latest stable OpenFOAM.com and OpenFOAM.org versions of OpenFOAM. Tested with Blender 4.2.
To learn to use SnappyHexMesh GUI, have a look at my video tutorial series Blender for OpenFOAM users.
Reasons to use SnappyHexMesh GUI
SnappyHexMesh GUI is beneficial for both SnappyHexMesh beginners and experienced users:
For beginners, the GUI helps by providing only the most important settings, without any need to know dictionary file details.
For experienced users, the GUI removes the needs to edit the various dictionary files (avoid typos and logic mistakes!) and to provide point coordinates manually.
The possibility to do visual inspection while setting up meshing reduces setup mistakes.
Use of one point of input (the GUI) for all settings and case clean-up decreases risk of setup errors, outdated intermediate files and missing commands. It also allows step-wise fast iteration of the mesh generation workflow, which speeds up mesh generation work, as the shortcomings of the mesh are exposed early.
Debugging time for fixing mesh generation issues is decreased, since the GUI decreases the complexity of the process.
The GUI provides a well-tested and consistent starting point for the numerous SnappyHexMesh settings, which should work fairly well for many cases out-of-box.
Current Status and Features
Currently implemented features include:
Creation of basic OpenFOAM case structure, including export of dictionary files (most importantly snappyHexMeshDict) and surface meshes as STL files
Automatic creation of blockMeshDict with cell size as a parameter
Calculation of cell count for the resulting block mesh
Definition of surface refinement levels for surfaces
Feature edge extractions (surfaceFeatureExtractDict or surfaceFeaturesDict)
Custom feature edge mesh objects (object names ending with “_eMesh”)
Definition of surface layers for surfaces
Creation of face zones and cell zones from surfaces
Volume refinement using surface meshes enclosing a volume
Limitations of SnappyHexMesh
To get a mesh with wanted features, the user is required to understand many of the features and limitations of SnappyHexMesh. Some of those include:
SnappyHexMesh mesh generation procedure is stochastic. If mesh modification iterations don’t result in good enough quality cells, the modification is partially reverted. That affects also nearby cells. Small changes can thereby propagate changes in the mesh, sometimes causing apparent randomness in the resulting mesh.
A small change in the value of a setting can make a large and apparently random difference to the results. The level of this chaotic “noise” depends on the measured quantity, and the combination of all settings and geometry.
SnappyHexMesh works by far best with perfect cubic background mesh (without gradings). If you need flattened or elongated cells, you can use transformPoints command after mesh generation to scale the mesh. You need to scale the surface geometry accordingly prior to mesh generation in that case, to get correct final geometry for the mesh.
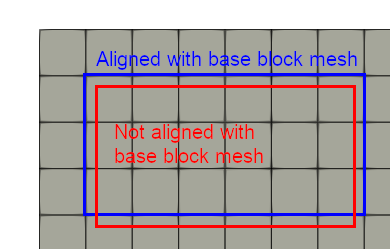
Good edge snapping requires alignment of background mesh with surfaces. Snapping to sharp edges can be compromised, unless the surfaces of the geometry are aligned / colocated with the internal faces of the background/base block mesh. The background mesh is shown as the light gray grid in the top images below. On the left case, there is misalignment, which results in poor edge snapping. On right, the background mesh is colocated with the surfaces, and edge snapping is good.
Provide surface geometry/definitions for ALL boundary surfaces for SnappyHexMesh, otherwise snapping may not work properly. If you insist on using patches existing in the background mesh, then be aware that the surface geometry must not overlap with the patches in the background mesh (cutting in perpendicular direction is OK).
Patch types for SnappyHexMesh must be either patch or wall. If you need other patch types, change the type in the boundary file after mesh generation.
Surface mesh quality is important. Surface meshes exported from 3D CAD tools are typically “dirty” (contain quality issues or outright errors). If surface mesh has issues, then the resulting mesh likely has issues, e.g. snapping problems arise. Review your surface meshes in Paraview or Blender and fix the issues. Snappy can work well with poor triangle quality (e.g. high aspect ratio triangle slivers), but the faces must be good (preferably no holes between triangles, and consistent face normal direction).
SnappyHexMesh is a very complex automatic mesh generation tool, with more than 50 settings available for the user to modify. The effect of changing a parameter value often depends on the value of many other parameters, as well as the case geometry (see https://github.com/tkeskita/snappyLayerTests/blob/main/test_result_analysis.md for some variation test results). This means that the combination of the 50+ parameter values plays a major role for the result. Not just any settings taken from OpenFOAM tutorials results in a mesh which works for all solvers and settings.
OpenFOAM fork and version of SnappyHexMesh can play a major role for the results. The current default fork is openfoam.com, due to it’s improved snapping and layer addition features.
Mesh quality and snapping/layer addition quality are interdependent. Too strict requirements for mesh quality (the settings in meshQualityDict) will lead to decrease in snapping quality and decrecrease in layer coverage. A “good” balance is often hard to achieve, and you often need to settle with a compromise.
A good coverage for layer addition with SnappyHexMesh is possible, but it has several prerequisites
Enough volume between boundary surfaces to displace (shrink) the base mesh cells, to make space for the layer cells. Total thickness of layers needs to “fit in”.
Enough refinement level (small enough cells) near curving surfaces.
Low curvature in locations where refinement level (cell size) changes.
Restraining layer growth near sharp external edges may be crucial for solver stability. Layer cells near sharp boundary edges can cause numerical issues for solvers. Collapsing layers away on purpose on the sharp edges using layerTerminationAngle and/or minVolRatio seems to be beneficial for solver stability. See Q: Help, my solver is crashing or diverging when I use a mesh from snappyHexMesh, but it is not crashing when I use castellated mesh!
Good snapping to sharp edges (feature edge snapping) depends on snapping settings and mesh quality settings. Edge meshes should be provided only for those edges for which snapping is wanted, to avoid misplaced snapping.
Check the castellated mesh first by reviewing it visually in Paraview. Snapping and layer issues may be due to steps or kinks in the castellated mesh.
Always check the resulting mesh with checkMesh and review it visually in Paraview before you apply the mesh in your application. However, be aware that not all mesh errors are show stoppers for many solvers. In lack of better knowledge, trial and error is required for testing the mesh in practice.
SnappyHexMesh can be run in stages, as long as the input data for subsequent runs is updated if necessary. Example: First run Snappy with only Castellation and Snapping phases, then run splitMeshRegions -largestOnly to remove unaccessible island cells. Before the second Snappy run to add only layers, you need to run surfaceMeshExtract command for each patch to extract the updated patch geometry for the second Snappy run. This is also one way to add layers to a mesh generated with another tool.
Installation and Start-up
Add-on is supported for newest LTS version of Blender, download Blender LTS version here.
Add-on code is available at https://github.com/tkeskita/snappyhexmesh_gui –> Code –> Download zip.
Start Blender, go to “Edit” –> “Preferences” –> “Add-ons” –> “Install” –> open the add-on zip file.
Activate the “SnappyHexMesh GUI” add-on in Preferences. Add-on is located in Object category of Blender add-ons.
Add-on visibility
Add-on is visible in Blender’s 3D Viewport in Sidebar as a separate Sidebar tab in Object Mode. To view the add-on panels, you must
Select a mesh object (in 3D Viewport or in Outliner)
View Sidebar (“View” –> “Toggle Sidebar” or press “N” key in 3D Viewport)
Select “SnappyHexMesh GUI” tab in the Sidebar
Quickstart
Create surface meshes in any suitable 3D modelling tool and export in STL/OBJ format
Import meshes to Blender (“File” –> “Import”) or model geometry directly in Blender
Adjust the add-on settings per object in Blender
Save Blender file to an empty case folder
Click Export button in the add-on to create OpenFOAM directories and files under the case folder
After export from Blender, start a terminal and source OpenFOAM in the
terminal (unless it is automatically sourced e.g. in your
~/.bashrc file). You should be able to run the ./run bash script
generated by the add-on in the case folder. Alternatively, you can run
the OpenFOAM commands manually in the case folder in order:
blockMeshsurfaceFeatureExtract(for openfoam.com version of OpenFOAM) orsurfaceFeatures(for openfoam.org version of OpenFOAM)snappyHexMeshcheckMeshOptionally run
postProcess -time '1:'to generate cell center coordinate and cell volume fields
You can view the final mesh using Paraview.
Iterative Workflow
Here is an example iterative workflow for working the whole mesh creation pipeline in a case folder. Meshing and reviewing the results is fastest when you start with a fairly large block mesh Cell Length, and tune only a few settings in the GUI at a time.
Clean up case folder by clicking on the Clean Case Dir button, or run the commands in terminal:
rm -rf 1 2 3 constant system processor* log.*Make modifications in Blender, save file, and click the add-on Export button
Run the
./runbash script, or the manual OpenFOAM terminal commands:blockMesh; surfaceFeatureExtract; snappyHexMeshRefresh Paraview to see updated mesh
Always check that the final mesh has correct scale, rotation and location.
Panels and Settings
SnappyHexMesh GUI consists of three main Panels: SnappyHexMesh GUI (top panel), Object Settings (middle panel) and Export Summary (bottom panel). By default all panels are expanded.
SnappyHexMesh GUI Panel
This panel contains overall settings and tool buttons. You can hover mouse cursor over fields to see tool tips for more information.
General Settings
Options with CPU count and toggle icons:
CPUs specifies the number of cores for decomposeParDict (scotch decomposition method is the default for decomposePar)
Do Castellation Phase
Do Snapping Phase
Do Layer Addition Phase
Export Scale is an optional scaling factor for STL geometry files and convertToMeters in blockMeshDict.
Fork defines the fork of OpenFOAM for compatibility of generated files. Currently it only defines whether to produce surfaceFeaturesDict (for openfoam.org) or surfaceFeatureExtractDict (for openfoam.com).
Export path defines path name where the add-on creates the OpenFOAM case files when the Export tool is run. The default value “//” means that the case folder is the same folder where Blender file is saved.
Generate Block Mesh indicates that blockMeshDict is to be generated during export using Cell Length as a measure for cubical cell sides.
Cell Length is the target length for the block mesh cube side, which will be created after export by running the OpenFOAM command blockMesh. SnappyHexMesh works best when the surfaces of the geometry are aligned / colocated with the internal faces of the background/base block mesh. Select Cell Length value accordingly and/or move the geometry surfaces to achieve alignment / colocation / overlap, if possible.
Quality Criteria
Disable All Quality Criteria uses such values for the meshQualityDict parameters that all quality checks made by snappyHexMesh pass. The resulting mesh is maximally snapped and layered, so this option is useful for testing that surface meshes, refinements and feature edges applied in a case work well for Snappy. With this option enabled, you can see what Snappy is able to create when it is allowed to create maximally bad cells. However, since the quality of such a mesh for numerical solution can be extremely poor, the use of the mesh with a solver typically fails. That is the reason to have quality parameters, and it also means that practically always there is a compromise between the numerical quality of the mesh and the quality of snapping/layering.
Note that mesh quality parameters below are hidden when this option is enabled. A warning text above Export button appears when this option is enabled.
Max Non-Ortho is a maximum value for the measure of how much the internal face normal direction deviates from the vector connecting the two cell centers (“owner” and “neighbor” cells of the face).
Note
Max Non-Ortho may be the most important mesh face quality parameter. A small value produces mesh that is good for the numerical solution of flow equations. However, a small value restricts snapping and addition of surface layers. Meanwhile, a large value yields a mesh that snaps to surfaces better and allows better surface layer coverage, but the mesh may cause numerical issues for some solvers. The current default setup uses a small value (35) for the snapping phase, and a large value (65) for the Relaxed Max Non-Ortho option applied in the layer addition phase. Note: Typical range is 35 <= Max Non-Ortho <= 80. Values higher than 65 may require usage of special numerical schemes which can handle the high non-orthogonality.
Max Internal Skewness (maxInternalSkewness property in meshQualityDict) is a face quality metric, calculated as the smallest distance from the center of an internal face to the line connecting cell centers, normalized by the line length.
Max Boundary Skewness (maxBoundarySkewness property in meshQualityDict) calculates boundary face skewness using a hypothetical mirror cell on the outside.
Note
Max Internal Skewness and Max Boundary Skewness play a role for solver stability, especially for cases with boundary layers, as high skewness typically is an issue for thin/flat cells. If skewness is too large, the solution tends to diverge, e.g. cell velocity magnitude increases to unrealistic proportions. If you experience stability issues with the mesh, try to decrease the skewness values. The cost is decreased layer coverage.
Min Triangle Twist defines a minimum allowed value for twist of cell faces.
Note
Min Triangle Twist is another important mesh quality parameter in practice. A value close to one will produce flat faces, at the cost of worse snapping. Values below one allow creation of twisted faces, which may cause numerical issues for some solvers. The default value 0.6 allows for some twisting, so if the resulting mesh exhibits numerical issues, try to increase this value to e.g. 0.7 or 0.8.
Min Vol Ratio (minVolRatio property in meshQualityDict) is the minimum required volume ratio of neighboring cells. This quality criteria is useful to force layers to collapse, to avoid creation of flat sliver cells, which may cause solver divergence.
Snapping Options
Feature Snap Iter defines the number of iterations for snapping to feature edges. With zero iterations, SnappyHexMesh does no effort to move cell vertices to sharp edges. This allows good quality cells to be created, but it also creates unsharp or bevelled edges in the mesh.
Note
Layer Addition may create diverging cells if Feature Snapping is applied and if cell edges don’t snap to edges perfectly. Therefore the add-on shows a warning Feature Snap Iters may create bad layers if Feature Snap Iter is larger than zero and if Do Layer Addition Phase option is enabled.
Layer Addition Global Options
These options are visible only if Do Layer Addition Phase option is enabled.
Warning
Addition of layers may create a mesh which causes numerical issues for some solvers.
Relaxed Max Non-Ortho is the maximum non-orthogonality applied only for the Layer Addition phase.
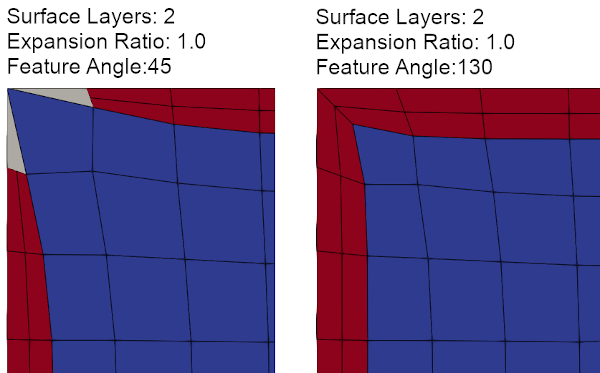
Feature Angle defines the edge angle for feature detection. When angle is larger than this value, layers are collapsed (removed) at the edge. This affects layer building near corners. A large value creates layers which fill sharp corners, while a low value removes layers near corners.
Expansion Ratio is the ratio of layer target thicknesses. Value larger than one will result in increasing layer thickness (from walls inwards).
Final Thickness is the relative ratio of the final layer thickness to the base cell side length.
Min Thickness is the minimum accepted relative layer thickness for any layer.
layerTerminationAngle (OpenFOAM.com option in snappyHexMeshDict) defines a maximum allowed angle for external surface curvature in layer addition. If angle is larger than the value given (edge is sharp enough), then layers are collapsed. Collapsing layers away near sharp edges seems to be helpful for solver stability (e.g. to avoid artificially high velocity in nearby cells due to numerical issues).
Tip
Layer addition seems to work better with openfoam.com version of snappyHexMesh than with the openfoam.org version. For openfoam.org version, you can try to add layers incrementally, only one or two layers at a time. To do that, disable Do Castellation Phase and Do Snapping Phase options, modify the Final Thickness and Min Thickness parameters, Export, and then run snappyHexMesh again.
Operators
The panel buttons launch the following operators:
Apply LocRotScale For All resets the Object Transformation Properties (Location, Rotation and Scale) of all mesh objects to default values. This makes measurement values always unambiguous, regardless of whether you have the Local or Global Value option enabled. It is suggested to run this tool before mesh modifications to avoid possibility of accidentally inputting wrong values.
Clean Mesh is a simple mesh cleaning operator, meant for rudimentary CAD mesh clean up. The operator goes through every selected mesh object. It merges vertices which are located closer than the Merge Distance option value given on the right side of the button. The operator also recalculates outward surface normals for all meshes. Number of merged vertices per object is given as return info from the operator. Note: Object scaling may affect the result. It is suggested to run Apply LocRotScale For All before running this operation.
Add Location In Mesh Object will add an Empty object named like Location In Mesh region0 to Blender scene. The region0 part in the object name is the name of the region (the default region name when the mesh contains only one mesh region is region0). If only one Location In Mesh empty object exists, the coordinates of this object is applied to specify the LocationInMesh coordinates. If no Location In Mesh empty objects exist, zero coordinates are used for LocationInMesh. If several such objects exist, then a list of object locations and names are exported to LocationsInMesh (openfoam.com option for multi-region meshing) section of snappyHexMeshDict.
Clean Case Dir command removes directory names 1-9, constant, system and processor* if they exist in the Export path. This effectively cleans up the case folder from any lingering OpenFOAM files, so that after running Export, the case folder should contain only fresh files, ready for OpenFOAM.
Export tool creates and saves the OpenFOAM case files under Export path using the overall settings in this panel and Object Settings for each mesh object included in the export.
If ASCII STL icon on right of Export tool is enabled, the STL files are written in ASCII text format instead of binary STL format.
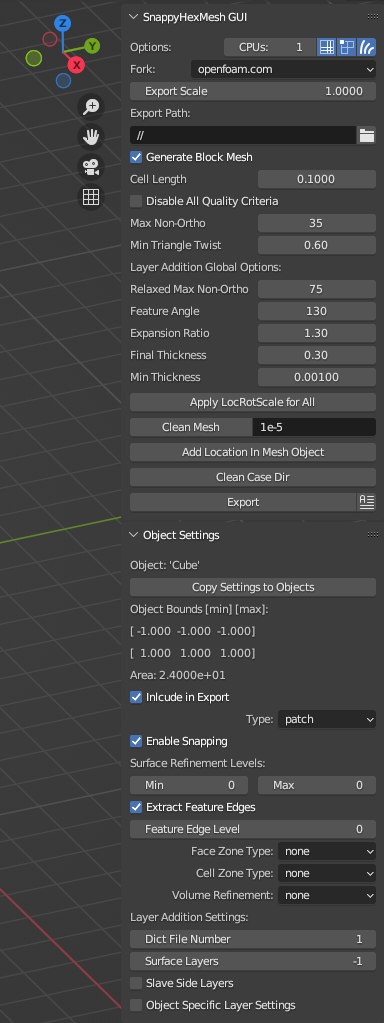
Object Settings Panel
This panel shows settings for the active (selected) mesh object. The panel top part shows information about the object. These information are also added as comments in snappyHexMeshDict upon export.
Object row shows the name of the active object.
Copy Settings to Objects tool copies the SnappyHexMesh GUI settings from the active object (the last selected object) to all other selected mesh objects. This allows mass modification of SnappyHexMesh settings when dealing with numerous objects.
Object Bounds [min] [max] shows the minimum and maximum coordinates of two box corners which span the volume included by the mesh object (bounding box).
Area shows the summed surface area of all faces included in the object. Warning: Includes mesh errors, like overlapping faces, if there are any.
Object Settings
Rest of the panel includes object settings:
Include in Export check box is used to mark which mesh objects are to be included in export.
Type specifies the OpenFOAM patch type for this object.
Enable Snapping check box marks inclusion/exclusion of this object for SnappyHexMesh snapping phase.
Surface Refinement Levels, Min and Max specify the minimum and maximum level of cell refinements made next to the surfaces of this object.
Extract Feature Edges check box marks whether Feature Edges (sharp edges) are to be extracted into eMesh format from this object (done by running the surfaceFeatureExtract or surfaceFeatures OpenFOAM utility). If Feature Edges are extracted, then they are also assumed to be included for Feature Edge Snapping in SnappyHexMesh. Note: Feature edges are not extracted if a second mesh object with same object name but ending with “_eMesh” is present. See Custom Feature Edges below.
Feature Edge Level defines a separate cell refinement level for Feature Edges.
Face Zone Type decides the type of face zones that are to be created for surface:
none: No face zone or cell zone are to be created.
internal: Face zone is created with internal faces (each face is shared by two cells). The face zone is additionally added to createBafflesDict, just in case you want to run createBaffles later on to separate internal face zone into baffles.
baffle: Face zone is created as baffles (overlapping unshared boundary faces).
boundary: Face zone is created as boundaries (unshared boundary faces).
Tip
For internal thin walls (for which you don’t need to resolve the actual thickness), provide the geometry for no wall thickness, and use the baffle Face Zone Type to create those walls. This improves the snapping compared to treating the thin walls as normal walls.
Note: Face zone name is same as object name.
Cell Zone Type defines the type of cell zones in relation to surface mesh, which is assumed to define a manifold surface which closes a volume:
none: No cell zone is to be created.
inside: Inside of the closed volume is to be included in cell zone.
outside: Outside of the closed volume is to be included in cell zone.
Note: Cell zone name is same as object name.
Note 2: Creation of a cell zone requires that face zone is also created for the same object.
Volume Refinement specifies that some cells are to be refined accordingly:
none: No refinement.
inside: Cells inside of the closed volume are to be refined.
outside: Cells outside of the closed volume are to be refined.
Volume Refinement Level shows the number of refinements for volume refinement.
Tip
For refinement volume objects, the typical settings are: Type: patch, Enable Snapping: disabled, Extract Feature Edges: disabled, and Volume Refinement: inside.
Object Layer Settings
The following Layer Addition Settings are visible only if Do Layer Addition Phase option is enabled.
Dict File Number decides which snappyHexMeshDict file this Object will be added for layer addition. Value 1 means that layers for this Object surfaces will be specified in the default snappyHexMeshDict file. Values larger than one will create additional snappyHexMeshDictX files, where X is the Dict File Number. This allows additional layers to be added with consequent runs after the main
snappyHexMeshrun, by commands likesnappyHexMesh -dict system/snappyHexMeshDict2. This is useful for creating intersecting layer patterns. In the cube example below, all three opposite cube face pairs have been separated, and layered in three separate snappyHexMesh runs. Warning: This sequential layer addition may create very bad cells, always check the result!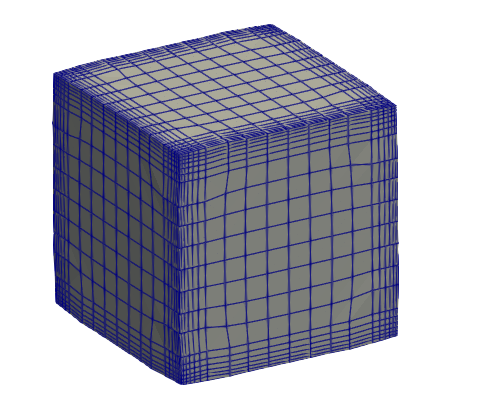
Surface Layers specifies the number of surface layers that are to be added to surfaces of this Object. Addition of surface layers requires that the Do Layer Addition Phase option (icon at GUI top) is activated. Default value -1 means that no surface layers are specified. Value zero means that no layers are allowed.
Slave Side Layers is relevant only for Face Zones of type Baffle or Boundary. It creates layer specification also for the backside of the face zone.
Object Specific Layer Settings allows optional definition of different layer addition settings for an object, instead of using the global options. The object specific settings are the same as the global settings described above: Expansion Ratio, Final Thickness and Min Thickness.
Export Summary Panel
This panel summarizes the overall properties of export.
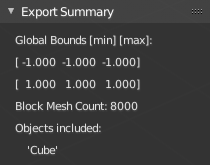
Global Bounds [min] [max] shows the minimum and maximum coordinates of the bounding box for all mesh objects included in the export.
Block Mesh Count is an estimate for the number of cubic cells in the background block mesh which covers the Global Bounds using cube side length specified in Cell Length parameter. The block mesh is to be created by running OpenFOAM command blockMesh. Note that the block mesh contains one extra layer of cells around Global Bounds to force the world boundary (the block mesh outer patches) not to overlap with any geometry surfaces.
Objects included lists all the mesh objects in Blender file, which will be exported when Export tool is run.
Custom Feature Edges
In a typical setup, snapping to sharp edges (feature edges) relies on the automatic detection of the feature edges from surface meshes using surfaceFeatureExtract (OpenFOAM.com) or surfaceFeatures (OpenFOAM.org) command. After running that command, you can view the extracted feature edges by importing the OBJ file to Blender or Paraview, e.g. from path constant/extendedFeatureEdgeMesh/objectname_edgeMesh.obj. The angle used in the extraction is specified in system/surfaceFeatureExtractDict or surfaceFeaturesDict (the default value is 150).
The automatic feature edge extraction works well for generally flat surfaces that include clearly sharp edges. However, if the surface mesh triangulation is coarse, or if the surface mesh is non-manifold, and if rounded edges or corners exist in the surface mesh, then the automatically extracted feature edges may include artefact edges. These artefacts can cause spikes and kinks to the snapped mesh.
An alternative to the automatic feature edge extraction is to specify
the feature edges with additional mesh objects containing edges, named
same as the main mesh object, with an additional end string _eMesh,
e.g. objectname_eMesh. If object name end part is _eMesh, then
that object is exported in OBJ format to constant/triSurface
folder. The OBJ file can be converted to the OpenFOAM eMesh format
with an OpenFOAM command like surfaceFeatureConvert
constant/triSurface/objectname_eMesh.obj
constant/triSurface/objectname.eMesh. The custom eMesh file is then
used by snappyHexMesh for snapping to feature edges, and the primary
object objectname is used for snapping. The automatically
generated run script contains the commands required for conversion.
Example and tutorial links
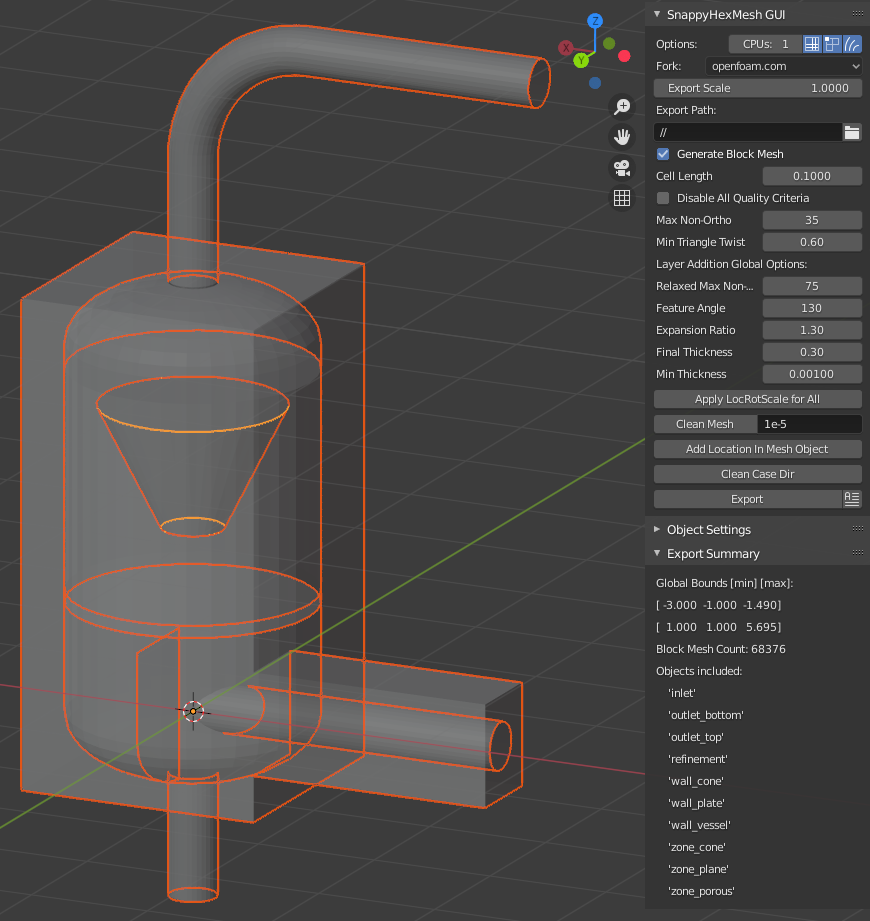
A vessel example is located in the add-on’s example folder called vessel.blend, which showcases some of the features.
Vessel geometry, wall, zone and refinement volumes in surface mesh format viewed in Blender
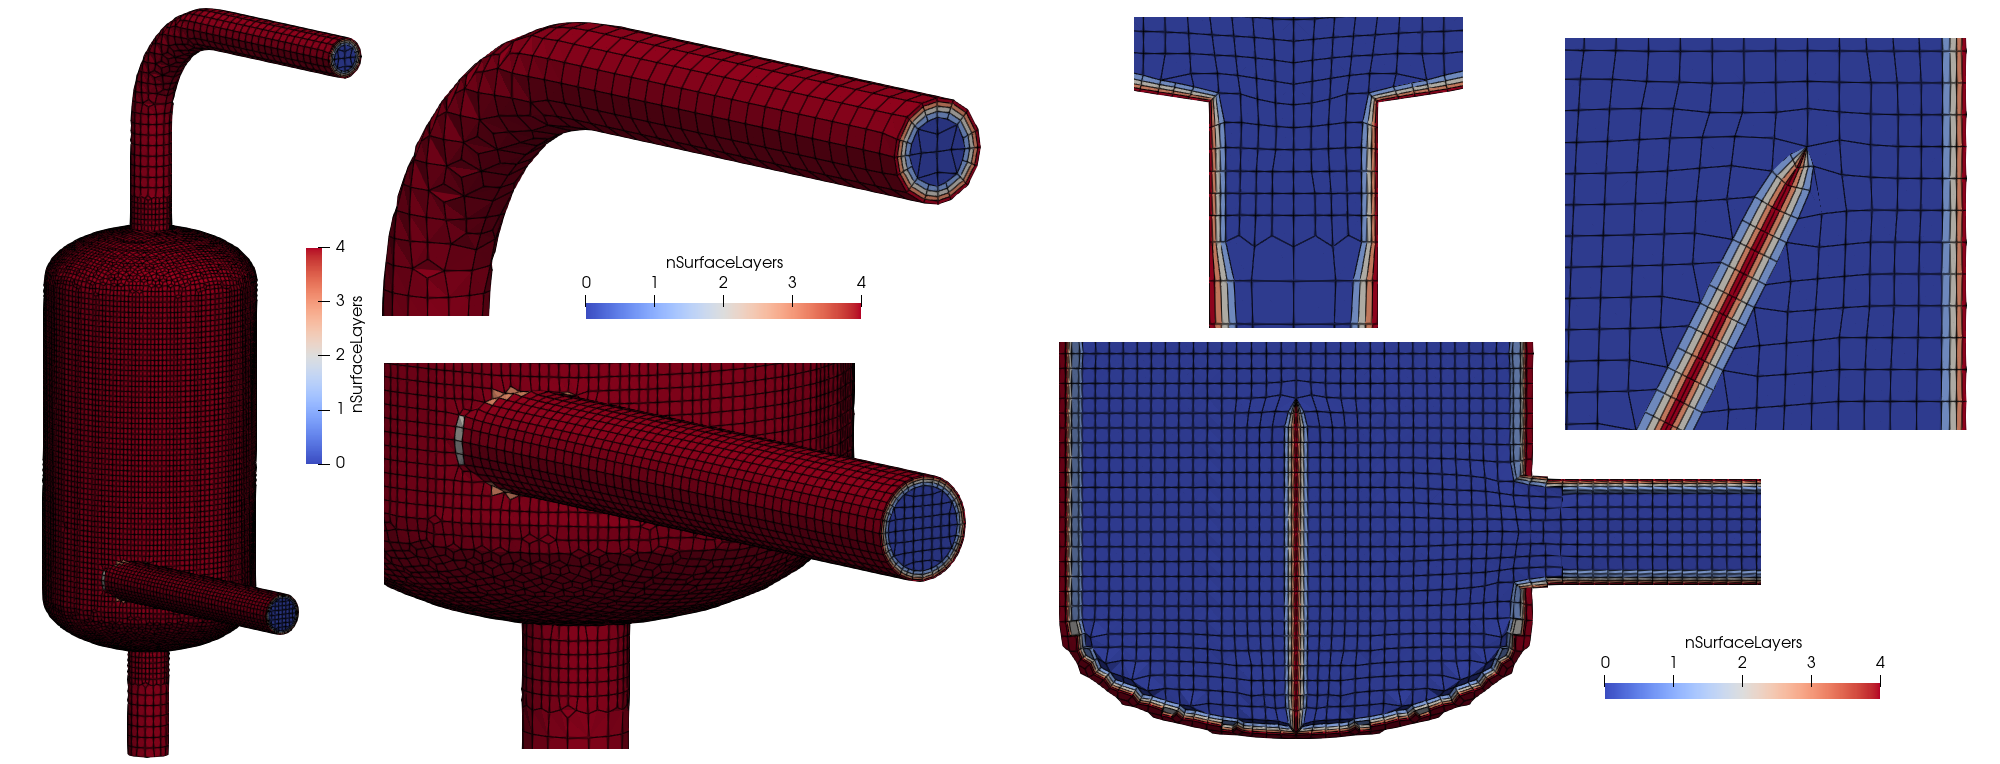
Resulting volume mesh with selected mesh details viewed in Paraview
I made a tutorial video series Blender for OpenFOAM users which has one tutorial for using SnappyHexMesh GUI
A Youtube tutorial illustrating the use of SnappyHexMesh GUI (by DaveyGravy, check also the other OpenFOAM related tutorial videos!).
Help and Feedback
You are free to file bug reports, ask and give advice by using GitHub issues feature. Before asking, please try to see and run the vessel example (see above) to make sure it works for you as expected. Also, please check Limitations of SnappyHexMesh and the FAQ section below.
Please provide a Blender file (no need to include anything else) with a small example to illustrate your problem and describe the issue. Please specify which OpenFOAM variant and version you use.
If you use this add-on, please star the project in GitHub!
FAQ
Q: I don’t want to use GUI, can you please just provide case files?
Sure, here you go: https://tkeskita.kapsi.fi/OF/cube_snappy_template.zip (compatible with OpenFOAM.com v2312 and at least v2412). See also Limitations of SnappyHexMesh.
Q: The mesh resulting from those settings isn’t good!
That depends on your definition of good. I argue that a mesh is good if it 1.) works with your solver and 2.) captures well enough the relevant physics that you seek to simulate. In many cases it’s not required to get perfect inflation layers everywhere to get good enough results. But there are exceptions. Sometimes Snappy just can’t give you what you want. See also Limitations of SnappyHexMesh.
Q: Why is my inlet/outlet/other patch cells malformed / big / not created?
A: Maybe your inlet/outlet/other patch does not coincide with (internal) faces of the cells of the base block mesh. You may also need to apply a sufficient level of refinement. See also Limitations of SnappyHexMesh.
Q: I’m getting refinement in unexpected locations, or weird results
A: Is your geometry aligned / colocated with base block mesh as much as possible? If yes, then your surface mesh might include errors which are so bad that even SnappyHexMesh is confused by them. Try to run the Clean Mesh operator and see if it helps. For more advanced CAD surface mesh clean-up and mesh healing, have a look at my tutorial videos Blender for OpenFOAM users.
Q: Why are some cell zones missing or wrong?
A: Face normals are not consistent, or they are flipped. To fix face normals, go to Edit Mode, select everything, and then run Mesh -> Normals -> Recalculate Outside or Recalculate Inside, depending on which side of the mesh surface is meant to be “inside” of the cell zone.
For openfoam.com version, cell zone surfaces should enclose the whole cell zone volume, while openfoam.org version needs only the surfaces separating the cell zone from outside. See OpenFOAM tutorial heatTransfer/chtMultiRegionFoam/shellAndTubeHeatExchanger for an example.
Tip: You can enable Face Orientation Overlay in Blender to visualize face normal direction by color. Red color means that “inside direction” is towards you, and blue color means that the “outside direction” (the face normal direction) is towards you.
Q: Why does a surface include faces in two different patches or face zones?
A: Your case probably includes overlapping surfaces in two different mesh objects. Remove the overlapping surfaces.
Q: Why is there a world patch in the final mesh? / Why is my mesh leaking?
A: You must always include a set of surfaces (in one or more mesh objects) which define the outer boundaries of your computational domain volume. Having faces which are visible in the final mesh world patch (even after refreshing Paraview!) indicates that your outer surface mesh is “leaking” (the final mesh is extending outside the surfaces which should define the domain volume). Leaking may also occur so that mesh extends inside surfaces that define a volume object located inside the domain. Leaking may be due to:
Missing surfaces (holes in surface mesh).
Big enough cracks (openings) exist in the edges between surfaces.
Enable Snapping option is disabled for an object
You may need to Add Location In Mesh Object to specify a point which is inside the mesh domain (otherwise it is assumed that origin is inside).
Model is too far away from origin. Since Blender uses single precision floats and OpenFOAM uses double precision, it may help to move the model close to origin.
To find out the locations which are leaking, you must add a temporary additional surface object (e.g. a cube or a plane) around model parts to see where leaking stops.
Q: Why is final mesh scale/rotation/placement wrong?
A: Likely because Object Location/Rotation/Scale is wrong for some object. If you need to do any movement/rotation/scaling when you import your surface meshes into Blender to get the end result correct, then it is good idea to use the Apply LocRotScale for All operator/button to reset the Object scale, rotation and location before continuing. If you don’t do this, then the measures shown in Blender can be affected by the Object transformations, depending on whether you have Global or Local value mode on.
Q: Cannot find file when extracting surface features
If surfaceFeatures (for openfoam.org) or surfaceFeatureExtract (for openfoam.com) command complains about cannot find file, make sure that the Fork setting at GUI top is correct.
Q: Layer addition crashes/segfaults on writeLayerSets
A: If you get Segmentation fault (core dumped) with the following kind of error message, it means that the layer addition failed to add any layer cells. The crash seems to happen when SnappyHexMesh tries to write layerSets with zero cells in the set:
Added 0 out of 1234 cells (0%).
Writing 0 added cells to cellSet addedCells
[stack trace]
=============
#1  Foam::sigSegv::sigHandler(int) in /usr/lib/openfoam/openfoam2312/platforms/linux64GccDPInt32Opt/lib/libOpenFOAM.so
#2  ? in /lib/x86_64-linux-gnu/libpthread.so.0
#3  Foam::snappyLayerDriver::writeLayerSets(Foam::fvMesh const&, Foam::List<int> const&, Foam::Field<double> const&) const in /usr/lib/openfoam/openfoam2312/platforms/linux64GccDPInt32Opt/lib/libsnappyHexMesh.so
#4  Foam::snappyLayerDriver::writeLayerData(Foam::fvMesh const&, Foam::List<int> const&, Foam::List<int> const&, Foam::Field<double> const&, Foam::Field<double> const&) const in /usr/lib/openfoam/openfoam2312/platforms/linux64GccDPInt32Opt/lib/libsnappyHexMesh.so
...
Q: Help, my solver is crashing or diverging when I use a mesh from snappyHexMesh
A: First, make sure that your solver setup is OK. To do this, use the castellated mesh from snappyHexMesh case time directory 1 and try to run the case with it. If it’s not working, the issue might be in your solver setup and not the mesh.
Q: Help, my solver is crashing or diverging when I use a mesh from snappyHexMesh, but it is not crashing when I use castellated mesh!
A: Your mesh might be causing numerical issues for your solver.
The SnappyHexMesh settings in SnappyHexMesh-GUI have been optimized so that the mesh should work well with simpleFoam solver, with consistent yes, U relaxation factor 0.8 and nNonOrthogonalCorrectors 3. For a refined mesh (+2 refinement levels on the surfaces) it was necessary to use U relaxation factor 0.7 and add p relaxation factor 0.3 (to fields section in relaxationFactors) to avoid simpleFoam divergence. The solver settings are available in https://github.com/tkeskita/snappyLayerTests/tree/main/foamCase/solverCase
Unfortunately these SnappyHexMesh settings may not be applicable as such for all solver and setting combinations. However, since you have one case which is failing and one case which is working, you can try to change one thing at a time in your setup to home in on the issue. Things you can try to change include:
Pinpoint visually (e.g. in Paraview) the location where divergence starts (e.g. the cell for which mag(U) starts to increase during solution). Is there a malformed low quality cell next to it? If yes, then the issue might be with the mesh.
Disable layer addition (use the snapped-only mesh from time directory 2). This test should indicate if the problem is with the boundary layers or not.
Try to force SnappyHexMesh to remove problematic cells, or create higher quality cells (at the cost of worse snapping and decreased layer coverage). For example, change the value of following parameters by 30% (or even less) of their current values, one at a time:
Decrease Relaxed Max Non-Ortho
Increase Min Triangle Twist
Decrease layerTerminationAngle
Decrease maxInternalSkewness and/or maxBoundarySkewness
Increase minVolRatio
Modify your CFD solver settings in fvSolution, e.g. add or decrease relaxationFactors values, or decrease tolerances.
Try to modify boundary conditions. Unstability issues may be related to a misbehaving boundary.
Q: Help, my solver is still crashing, and I can’t find the issue!
A: You can try to post your case into a forum like CFD-Online but please read the instructions on the forum first!
Q: Why build a SnappyHexMesh GUI on top of Blender?
A: Mainly because of Blender’s GUI Python API, 3D Viewport and surface mesh modelling tools. Blender has powerful tools for polygon surface modelling and modification, and is suitable also for precision modelling required by engineering/scientific applications, although the learning curve to take advantage of all features is steep.
Q: How do I learn Blender?
A: See links at https://openfoamwiki.net/index.php/Blender
Q: How do I learn SnappyHexMesh?
A: See links in https://openfoamwiki.net/index.php/SnappyHexMesh, especially the Engys presentations at OFW7: https://openfoamwiki.net/images/f/f0/Final-AndrewJacksonSlidesOFW7.pdf and OFW11: https://openfoamwiki.net/images/b/b2/OFW11-Jackson-advSHM-FINAL.pdf
Details about SnappyHexMesh parameters can be found in the annotated caseDicts:
For openfoam.com (development version), see https://develop.openfoam.com/Development/openfoam/-/blob/master/etc/caseDicts/annotated/snappyHexMeshDict
For openfoam.org (development version), see https://github.com/OpenFOAM/OpenFOAM-dev/blob/master/etc/caseDicts/annotated/snappyHexMeshDict
See also my presentation SnappyHexMesh in Practice at Finnish OpenFOAM Users Day 2025
Q: How do I learn OpenFOAM?
Q: I’m actually looking for a GUI for OpenFOAM and not just a GUI for SnappyHexMesh..
Please check List of GUIs in OpenFOAM wiki. However, please be aware that OpenFOAM is developing at a rate which no GUI developer can match, so the features supported by GUIs will always be limited or potentially broken beyond supported OpenFOAM versions.
OpenFOAM Trade Mark Notice
This offering is not approved or endorsed by OpenCFD Limited, producer and distributor of the OpenFOAM software via www.openfoam.com, and owner of the OPENFOAM® and OpenCFD® trade marks.